Rabu, 29 Februari 2012

Cafe Shelves Tutorial

Happy Hump Day!  Over the last couple of months, I've received quite a few e-mails asking how I made the cafe shelves in our kitchen.  Sooo, I thought I'd take a moment to I share what I did! 

Honestly, I can't take any credit for how I made them.  I simply followed Traci's(Beneath My Heart) fabulous tutorial.  In fact, you can just go ahead and stop reading my post now and head on over to read her super easy-to-follow steps!  BUT, if you choose to keep reading my post first, here are my "ingredients:"

1 handsome hubby and friend/neighbor ("the handy fireman")
1 crazy decorator
3 kids
3 1x12s (that were cut by the nice folks at Home Depot down to 30" long)
2 long pieces of case molding of your choice
6 corbels of your choice
Miter Saw
Wood Glue
Finishing Nails
Zinsser Primer
150 sanding block
AS Old White chalk paint
AS clear wax
Hot Tub
Cocktail of your choice

First step was to convince handsome hubby and "the handy fireman" to take the cabinet down (oops, and, yes, folks you can see that I'm a lazy painter who never painted the inside of her cabinet doors):


While they did this, I set up shop in the garage with my supplies (having already primed my shelves). 


Once the cabinet was down, it looked like this (ugh):


I was worried that we were going to have to paint the entire 18' high wall all over again, but was pleasantly surprised that after my handsome hubby spackled and sanded, and I painted, you couldn't tell that we only painted the exposed dry wall (SW Ivoire)!


Now, the hardest part ... cutting the case molding, especially because I had never used a miter saw before!  After practicing on extra wood making the 45 degree cuts (and failing miserably), I decided to let the true *professionals* handle it ... kids rule!


Seriously, though, once I (and a neighbor) figured out which way to angle the saw in order for the corners to sit flush against one another, it went really smoothly (although, your arms will ache after you're done ... this is where the hot tub and a drink came in handy)!  LOL


After the cuts were made for each shelf, I simply added wood glue to the back of the longest piece of molding and pressed it against the front of the shelf.  While I held it, my hubby added five finishing nails.  We then did the same for each side piece (only adding three finishing nails to the side pieces).  

After that was complete, I added a fingertip full of spackle to each nail hole ... sanded after the spackle was dry and then painted the shelves with AS Old White chalk paint (propping each one up on various soup cans), followed by distressing and waxing.  I did the same to the corbels, as well:


After they were dry, it was time to hang them.  This was the second hardest part because I am OCD when it comes to measurements being exact (and I fail miserably getting said exact measurements on the first, second and even fifth *trys* (lol) ... that's when the frustation come into play.  In fact, I'm surprised that this picture isn't out of focus from my husband laughing at my use of "not so pleasant" language as he took the picture.  I ended up placing the corbels 7" apart.


After I mounted all of the corbels, I placed the shelves on top and added two flat head screws (one on each side towards the back, seated into the corbels) so that the shelves would sit firmly in place.  Once that was done, then came the fun part ... accessorizing!

Let's look back one more time ... BEFORE:


AFTER: Here is how they look today, with splashes of Easter added:


So, I leave you with this ... if there is a place ANYwhere in your home where you've wanted to add shelves or just a blank space and you're not sure *what* to add ... truly consider adding cafe shelves that you can build yourSELF.  If I can make them ... YOU can ... I promise (but, if you need to borrow my husband and/or Jax and his precious buddies, you may)!  LOL!  And, don't forget to check out Traci's tutorial (linked above)

Thanks for stopping by! 

Selasa, 28 Februari 2012

aPaulogy ~ Curious Illustration

I met Priya Sebastian for a cup of chai few days back.
She suggested we drop by at this quaint place at the edge of Richard's Park in Richard's Town, which houses the work of Bangalore-based illustrator Paul Fernandes.
paul8

Not knowing what to expect I just followed her obediently into this space, habitually taking out my camera while she exchanged pleasantries with Mona and Jatin of aPaulogy~ Curious Illustration.

As I looked around this colourful space, I was at once enveloped in a multi-hued world of water colours!
What followed was an hour of surfing the waves of sheer nostalgia of the years spent in the beautiful Cantonment area of Bangalore.
paul2
Paul Fernandes' illustrations are an ode to this charming part of Bangalore. Light-hearted, funny depiction of scenes from the days gone by~ the 70's, his memories and experiences and of friends and families.

paul12
He's work has captured some grand landmarks of the area, which conjures up numerous memories in people who have lived here. The work is also a satirical take on these fast disappearing heritage buildings and structures.

paul11
The charming Mona taking us on a trip down memory-lane. She narrated such delightful little stories associated with each illustration and also some very interesting piece of information.

paul5
Thom's Cafe, a landmark building on Wheeler's Road! I have such fond memories of picking up their warm, fresh out of the oven bread, you drop a blob of butter on it and it would melt:-)

Mona tells us that, in 'those days' it was the only cafe in the Cantonment area which had a Jukebox and they played some lovely music.

paul3
His gallery is peppered with vintage furniture, collectibles and memorabilia's that are remnants of the old Bangalorean charm.

paul4
Paul is a collector of miniature vintage cars...

paul9
An old framed photograph.

paul10
Miniature cars glide on window sills and on tables...

paul1
Paul has captured some beautiful heritage houses, which are fast disappearing.

paul6
This illustration depicts the sincere policemen of yesteryears checking for lit oil lamps on the cycles. There is an antique lamp placed next to the artwork, which almost brings the scene alive!

paul7
Priya and Mona engrossed in one of the illustrations depicting a scene of a pre-wedding Mangalorean party.

paul13

What a fabulous treat it was to the senses, we walked out feeling like one of the characters that Paul Fernandes so beautifully brought to life, from another era.

A little melancholy lingered in my heart thinking about the heritage buildings, that filled us with so many happy memories, were slowly disappearing giving way to huge concrete structures.

Presently Paul Fernandes walks the various mains and streets trying to paint the other remarkable landmarks of Namma Bengaluru!

Kudos Paul Fernandes!

(images by Arch)

Easter Mantel Snippets ...

Greetings, friends !!  What a GORGEOUS day it is outside ... I'm off to enjoy it !!
But, first, I thought I'd share a few sneaks at our Easter mantel.  I'm not quite done, but considering how truly *Spring-like* today feels, I thought I'd share a few of the goodies I've included so far.

Spring "faux" florals that I almost want to sniff:


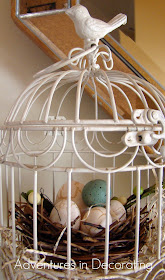
A sweet birdcage from Michael's (the fact that it was 40% off made it even CUTER):


Yet another *ca-ute* bunny from Pier One:


Annnnd, a fun banner full of Spring colors!


I'll be back soon to share more of that and our *almost* complete master bath!

Thanks for stopping by!

Cooking & Eating Areas........

In the kitchens and dinning rooms you need to incorporate easily accessible storage for dinning essentials such as glassware, crockery and table linen. It's vitally important that the table and chairs leave enough room for your guests to sit comfortably at the table.

Do:
  • Allow enough space-about 70-100 cm (28-40) - for chairs to be pushed back from the table.
  • Appliances need access space; you will probably need to allow 65 cm (26 inch) to open the oven door.
Don't:
  • Place too many chairs around the table, or guests will feel cramped
  • Position furniture so it blocks access to cupboard doors.

Source from Homez Deco....


Dining Room Sizes

Decorating a dining room area depends on a case-to-case basis.


There are many factors that determine, say the size of the room, the furniture that you put in, and the overall design.
Of course, there are many things to consider. One of them is the number of people that will be using the dining room on the average. It also needs to bee single out on how formal or informal a homemaker wants the dining room area to be.
The current trend among modern homes is that a casual eating area is created adjacent to the home kitchen then a formal dining room area is built to entertain guests, family, and friends. This formal eating room is usually only used during special occasions.

Dining Room Sizes

One of the most important factors to determine when building a dining room area is the size. As mentioned, dining room sizes vary widely, depending on the need and requirements of a household.
Ideally, you should factor in the sizes of your dining furniture to determine how big or small the room should be. The size of the table and chairs must be accommodated freely to the floor plan so as to give the diners enough elbow room to move around comfortably. Otherwise, your guests or even your family member will not be able to enjoy the meals.

Chairs must have at least two feet clearance from each other. This is to allow the diners enough space to occupy the seats. There should also be at least two feet allowance for traffic between the dining room table and the chairs.

Dining room sizes can be big or small, again, depending on how many people intends to use them. For a family of six, a dining set that could sit in all of them would fit into a small dining room size. Then again, it is a different story altogether if the house owner receives a number of guests too often. In that case, you will have to make the necessary allowances. Some homemakers prefer to have an adjustable dining room area with an expendable table and a few extra chairs. Some, however, find it more convenient to have the extra room for dining guests to be there all along.

Also, a good thing to consider when thinking about dining room sizes is the amount of space that the house in general would allow. There is no sense in having an extra huge dining room area and leave too little spaces for the other significant rooms in the house.

To be continued.....in Bedroom section...

Senin, 27 Februari 2012

Your Living Room Layout Guide

Your living room layout is a large part of what will make your space feel comfortable and well organized. Learning what things to look for and where to start is what will make the overall process a lot easier.
Use this step by step guide to figure out how you should layout your living room to get the best results and avoid problems later on.

Existing Space Analysis

The first step in developing you new living room layout is to review your current space and make note of the existing elements. It is not absolutely necessary to draw out your space as this step by step guide suggests but it is helpful when trying to visualize and start from scratch. One thing I would encourage if you decide to skip the drawing stage is to pay attention to your existing electrical locations. Taking this into consideration will prevent some frustration later on.

Living Room Layout Sketch
  1. living room layoutUsing graph paper you will layout your living room to a scale of 1/4" = 1'-0. Remember that each square of the graph paper will represent one foot.
  2. Measure out the length of all the walls, doors, windows, and any other structural elements (ie. fire place & built in units) within the space. You will then transfer this information onto your graph paper using the measurements you just took. Make sure when you are drawing your existing living room plans that you indicate the direction of every door swing (into or out of the room).
  3. Next, walk around your living room and locate all the electrical outlets making note of their location on you new floor plan.
You are now ready to begin experimenting with various furniture arrangement ideas.

Furniture Arrangement

Begin your living room layout by creating paper cutouts as furniture templates of the existing or new furniture pieces you want to use. Doing this will help you position the furniture in the room quickly and easily. Make sure you have the correct sizes of these pieces to make your living room plans more accurate.
Start by choosing a focal point in your living room. This can be anything from a fire place, a large window, an entertainment unit, a book display and even a piece of artwork on the wall. Arrange your furniture around your focal point starting with your largest furniture piece (usually a sofa or sectional). Try to create a conversation area by arranging your seating in a U-shape (or a directly adjacent setup for smaller spaces) instead of an L-shape configuration. This establishes a more comfortable conversation arrangement allowing people to have easier eye contact with one another instead of being forced to twist their bodies. In addition to that people generally like to have a maximum distance of 8 to 10 feet between them when socializing.

Large or open living room areas can be a challenge to layout as they sometimes begin to feel too spacious and disconnected. In these situations it is beneficial to separate your space into sections or groupings for different activities. Three separate areas may be a main conversation/seating area, a secondary seating/reading area, and an entertainment area. It's a good idea to always keep in mind the relationship between the different areas which can usually be done by creating a natural flow from one to the other.

Small living rooms are sometimes difficult to layout as they often begin to feel too cluttered. In these situations remember that less is more. Avoid the “overstuffed” look by removing some unnecessary furniture pieces or by finding new smaller scaled pieces to replace the existing. The smaller scaled furniture will create a balance in the space and help the room feel larger than it really is.
Try to think outside the box and play around with a few different furniture arrangement ideas. You'll be surprised with how many variations you come up with.

Things To Consider
There are few things to consider when laying out your new living room arrangement.
  • Traffic pattern & flow throughout the space
  • Balance & scale of furniture
  • Placement of lighting and other electrical items
  • living room layout
To be continued...thank to IRD Designing......

SITTING ROOM ARRANGMENTS.....

Place sitting room furniture in a group to encourage relaxed conversation, which enough surfaces within reach for lamps, glasses and books. Your main aim here is to create a welcoming space that's perfect for both relaxing and for entertaining.

Do:
  •  Leave enough space for guests to sit down easily
  • Make the furniture accessible from the door
  • Place coffee or side tables no more than 45 cm(18 inch) away from the sofa and chairs to ensure they are within reach when you're seated.
Don't :
  • Place all the furniture against the walls; your room will look institutional, and the space between the furniture will inhibit relaxed conversation.

Minggu, 26 Februari 2012

HIZO NI SEHEMU AMBAZO TULIWAPANDIA MAUA


hapo ni kwenye jengo kubwa la ofsi za utengenezaji wa glasses za aina mbalimbali, duniani, tuliwapandia
maua, na kukatia baadhi ya miti yaani pruning,also we did mowing their lawan ni sehemu kubwa,
  sana ilituchukua muda, kitu ninachowapendea wenzetu wanajali wanalipa vizuri, hakuna longo longo usumbufu, ahadi hewa nope nope mnakubaliana kazi unapewa na advance up front ukipungukiwa unawajulisha, siyo dar kwanza musumbuane, mpotezeane muda hakuna kitu kinachoniudhi mtu anakuambia nitakuja tuongeo, nina kazi, unamsubiri haonekani hata simu akupigie kukujulisha kwamba nimepata dharura, 
jitahidini tusipotezeane muda, una udhuru nijulishe mapema  najua kuna kuwaga na dharura toa  taarifa, time to me is more than money . tafadhalini wateja tujali muda, pamoja na traffic jam ya dar na matatizo,   yote.  asanteni.
 
 
Till next time, it's me Jossyanne..

HIZI NI BAADHI YA KAZI TULIZOZIFANYA, LAST SUMMER


Uwaga tunapata kazi maeno tofauti tofauti, inaweza ikawa to mowing the lawans kukata majani kwa kutumia tractor au inaweza kupanda maua sehemu za maofisini so or to prun to cut down the tree limbs or twigs
so inakuwa rahisi kwa kuwa tuna vifaa vyote, ukiwa huna vifaa wapendwa inachukuwa muda mrefu sana unachoka na hilo jua la dar, joto kazi inakuwa ngumu ila polepole tutafika tuu, pia jambo lingine linalokera ambalo wapanda maua wengi walinilalamikia ni wateja kutojali kazi za magardeners wanawalipa kidogo sana au mtu atoe nusu kumalizia nusu inakuwa taabu, sisi ktk kazi zetu hatuitaji usumbufu sitaki kabisaa kitu cha kwanza ukiitaji huduma toka kwetu lazima tufike nyumbani kwako au kazini au sehemu ya bihashara tufanye tathimini ya kazi, itagarimu kiasi gani? tupange kabisa  budget maana  ni muhimu. anayefanyia kazi ajuwe kabisaa ni kiasi gani itagarimu siyo tena tuanze kulaumiana, kuna baadhi ya vitendea kazi havinaga bei maalum, pia tuangalia suala la umbali, suala la maji na umwagiliaji ni suala ambalo ni mteja tutakuelekeza
  ni wakati gani umwagilie, na saa ngapi maana wengi wenu amjui umwagilia saa ngapi so tutazidi kuelimisha
   wadau asanteni.

HUU NI MUENDELEZO WA STAGE 4 PLANTING, COULD BE FLOWERS BUSHES,LAWNS OF SHRUBS


Wadau wa landscaping nataka muelewe  umuhimu wa weather or hali ya hewa ya  maeneo mnayoishi hii inasadia sana, kujua ni aina gani ya maua miti, majani yanayotakiwa kupandwa,  sehemu za joto kwa mfano Dar. hali ya hewa ni joto so huwezi kupanda maua aina ya tulips,hyranders or roses,,  hizi rose zinatofautiana kuna zinazostahimili joto na pia kuna roses za kwenye maeno ya baridi.

 Kwa wakazi wa dar ningewashauri kama una mpango wa kuanda maua ya aina yoyote ile, udongo ni muhimu mbolea na  umwagiliaji siku za mwanzo pia panda maua pindi mvua zinapoanza, maua miti au vichaka vinavyostahili hali ya hewa ya Dar ni maua ya lilies gadenians black tiger eyes, bouganivillia
  ibisicus(pls google haya majina ya maua na utayaona), haya maua yanasahimili sana jua joto,  au magnolia stellata  maua haya yanapenendezesha sana bustani za majumbani au makazini,   au sehemu za bihashara, 
 
ninahamasisha sana wadau wa mazingira kutafuta watu ambao ni wataalum wa gardens, unapokuwa na kazi, hii kazi ni ya landscaping, wapo ambao pia wanafanya local gardens wanafanya kazi nzuri nilitembelea maeneo mbalimbali hapo dar i was very impressed by many local gardeners wanafanya kazi nzuri tuu  ila  mkijigipanga mnaweza kuweka professional landscapers ndio ni aghali ila utafurahia matokeo.

Sabtu, 25 Februari 2012

What Is It ...

So, one of the items on my "to do" list this year is to go through my bazillion pictures and either delete them or save them to a thumb drive so that I'm not suffocating my "C" drive anymore!

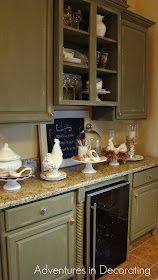
As I was doing so, I came across this picture of our dry bar from Fall 2010 ... notice the warm and darker colors splashed around ... the "tuscan" feel ... the "wine" vignette ... the warm, maple cabinets.  Back then, I could've never imagined wanting a lighter color palette.


Especially using almost ALL lighter pieces ... such as this:


or, this:


nor, could I have *ever* imagined picking up a paint brush and using these on my cabinets!


Or, removing glass cabinets to expose open shelves:


And, adding a cute, little "moo":


And, this:


All, to achieve ... this!


One thing that won't ever change is my love for adding feathers:


Nor, creating fun vignettes (and using my cheese knives from PB whenever I can):


Quite a change, isn't it, from this:


To this:


What is it in our brains that causes our decorating tastes to change?!  If you come up with the answer, please don't let me know because I kinda like the color palette my brain is enjoying right now!  :)

PS: While you are thinking about the answer, I'd love it if you'd look over on my right sidebar and "follow" me through the "Linky Follower" option that I just added ... I'm sad that I may lose some of you once once Google Friend Connect does its thing next month.

Happy Saturday, friends!